
Access to remote machines became a necessity a long time ago and we can hardly imagine what it would be like if we could not control computers remotely. There are many ways to establish a connection with a remote machine depending on the operating system you are running, but the two most widely used protocols are:
- RDP protocol (Remote Desktop Protocol) for Windows machines
- Secure Shell (SSH) mostly with Linux but also usable with Windows.
Both protocols use client and server applications to establish a remote connection. These tools let you remotely access and manage other computers, transfer files and do practically everything you can do while physically sitting in front of the machine.
Preconditions
Before you can establish a secure connection with a remote machine, you must meet a few basic requirements:
- The remote computer must be turned on at all times and have a network connection.
- You need the IP address or the name of the remote machine you want to connect to.
- You must have the necessary permissions to access the remote computer.
- The firewall settings must allow the remote connection.
- The client and server applications must be installed and operational.

What is SSH?
Secure Shell, sometimes called Secure Socket Shell, is a protocol that allows you to connect securely to a remote computer or a server using a text-based interface.
When a secure SSH connection is established, a shell session will be launched and you will be able to manipulate the server by typing commands in the client on your local computer.
System and network administrators use this protocol the most, as well as anyone else who needs to manage a computer remotely in a highly secure manner.
How does SSH work?
To establish an SSH connection, you need two components: a client and the corresponding server-side component. An SSH client is an application that you install on the computer you will use to connect to another computer or a server.
The client uses the provided remote host information to initiate the connection and, if the credentials are verified, establishes the encrypted connection.
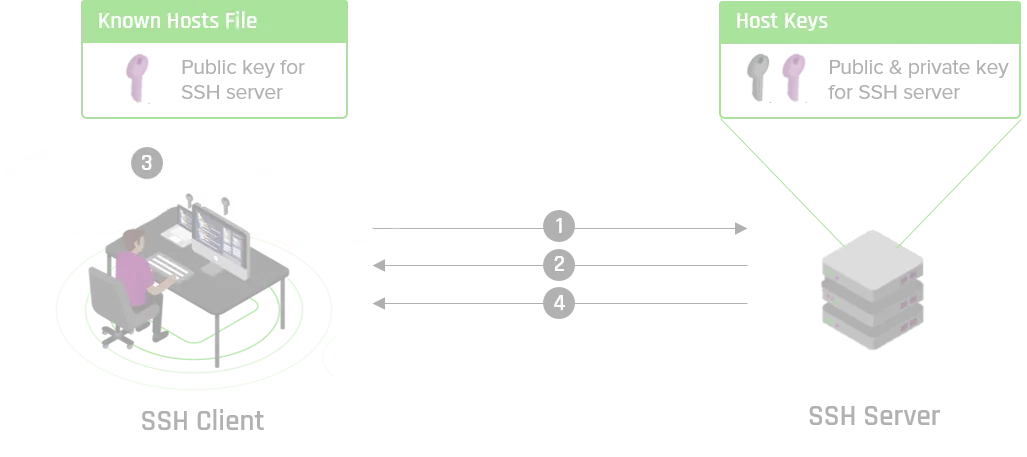
1. The client initiates the connection to the SSH server.
2. The server sends its public key to the client.
3. The server's public key is saved in the client's known hosts file.
4. The client and the server negotiate the connection parameters and establish the connection.
On the server side, there is a component called the SSH daemon that constantly listens on a specific TCP/IP port for possible client connection requests. Once a client initiates a connection, the SSH daemon will respond with the software and protocol versions it supports and the two will exchange their identification data. If the provided credentials are correct, SSH creates a new session for the appropriate environment.
The default version of the SSH protocol for communication between the SSH server and the SSH client is version 2.
How to make an SSH connection
Since creating an SSH connection requires both a client and a server component, you have to make sure they are installed respectively on the local machine and the remote machine. One open source SSH tool — widely used for Linux distributions — is OpenSSH. Installing OpenSSH is relatively simple.
It requires terminal access on the server and on the computer you use to connect. Note that Ubuntu does not necessarily have an SSH server installed by default.
A. How to install an OpenSSH server
To accept SSH connections, a machine must have the server-side part of the SSH software toolbox.
To check whether the OpenSSH server is already installed on the Linux system of the remote computer that must accept SSH connections, you can try to connect to the local host itself:
- Open a terminal on the server machine.
- Type ssh localhost and press Enter.
- For systems without an SSH server installed, the response will look like this:
username@host:~$ ssh
ssh: connect to host localhost port 22: Connection refused
If this is the case, you will have to install the OpenSSH server. Leave the terminal open and run the following command to install the SSH server:
sudo apt-get install openssh-serverThe required files will be installed, you can then check whether the SSH server is running on the machine by typing this command:
sudo systemctl status sshThe response should look like this if the SSH service is working correctly:

Another way to test whether the OpenSSH server is correctly installed and accepting connections is to try to run the ssh localhost command again in your terminal prompt.
ssh localhostIt is necessary to confirm the first connection to an unknown host.
"Are you sure you want to continue connecting?"
Type yes to continue then enter the password of your user.
The result will look like this when you run the command for the first time:

Here you have connected to your own server in what is called a "localhost" connection, that is, to the local host itself. We will soon see how to access the server remotely, so from another host!
Congratulations! You have configured your server to accept SSH connection requests.
B. How to install an SSH client
Before proceeding with the installation of an SSH client, make sure it is not already installed. Many Linux distributions already have an SSH client by default.
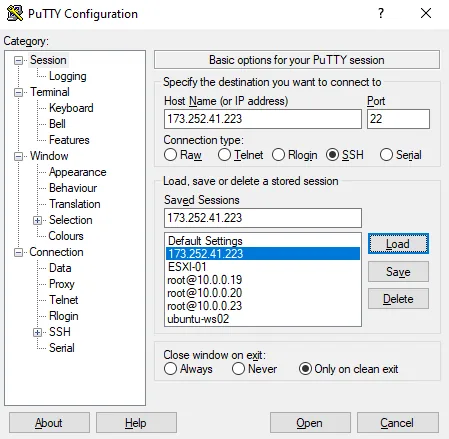
For Windows systems, you can install PuTTY or any other client of your choice to access a server. Official download link for PuTTY.
For Linux systems, you can check whether the client is already installed:
- Type ssh in a terminal and press Enter.
- If the client is installed, you will receive a response that looks like this:

This means that you are ready to connect remotely to a physical or virtual machine. Otherwise, you will have to install the OpenSSH client by running the following command:
sudo apt-get install openssh-clientYou will now be able to use SSH to connect to any machine with the server application, provided that you have the necessary privileges to access it, as well as the host name or the IP address.
How to connect via SSH
Now that the SSH client and server are installed, you can establish a secure remote connection with your server. Here is how to proceed:
Two choices to connect, A or B.
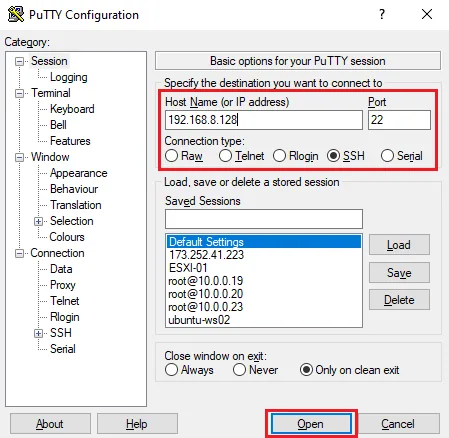
A. From a Windows client such as PuTTY
- Note the IP address of your server. For Ubuntu with the command: ip address
- Open PuTTY or any other terminal emulator software.
- Select the SSH connection type and make sure to be on port 22
- Enter the IP address or the host name of the remote server.
- Click "Open" to open the connection
B. From a terminal
- Open the SSH terminal on your machine and run the following command: ssh your_username@host_ip_address If the user name on your local computer matches the one on the server you are trying to connect to, you can simply type: ssh host_ip_address And press Enter.
- Type your password and press Enter . Note that you will not get any feedback on the screen while typing. If you paste your password, make sure it is stored securely and not in a text file.
- When you connect to a server for the very first time, it will ask you whether you want to continue connecting. Simply type yes and press Enter . This message only appears this time because the remote server is not identified on your local machine.
- An ECDSA key fingerprint is now added and you are connected to the remote server.
If the computer you are trying to connect to remotely is on the same network, it is better to use the private IP address instead of the public IP address. Otherwise, you will have to use only the public IP address. In addition, make sure that you know the correct TCP port that OpenSSH is listening on for connection requests and that the port forwarding settings are correct. The default port is 22 if no one has changed the configuration in the sshd_config file. You can also simply add the port number after the IP address of the host.
Configure an OpenSSH server
In this first step, you will implement some initial hardening configurations to improve the overall security of your SSH server.
Most of the configurations for OpenSSH that you implement using the standard OpenSSH server configuration file are found in /etc/ssh/sshd_config.
By modifying the configuration file of the SSH daemon, you can for example change the default port for SSH connections.
If you need to install nano, run this command:
sudo apt-get install nanoPlease note that, to make it take effect, you must restart the SSH service each time you make changes to the sshd_config file by running this command:
sudo service ssh restartBefore continuing, it is recommended to make a backup of your existing configuration file, so that you can restore it in case something goes wrong.
Make a backup of the file using the following command:
sudo cp /etc/ssh/sshd_config /etc/ssh/sshd_config.bakThis will save a copy of the file in /etc/ssh/sshd_config.bak.
In the terminal prompt, run this command:
sudo nano /etc/ssh/sshd_configThe configuration file will open in the editor of your choice. Here we used nano.
Note: the OpenSSH server configuration file includes many default options and configurations. Depending on the configuration of your existing server, some of the recommended hardening options may already have been set.
When editing your configuration file, some options may be commented out by default using a single hash character ( #) at the beginning of the line. To modify these options or to make the commented option recognized, you will have to uncomment them by removing the hash.
First, disable login via SSH as the root user by setting the following option:
PermitRootLogin noThis is extremely beneficial, as it will prevent a potential attacker from connecting directly as root. It also encourages good operational security practices, such as operating as an unprivileged user and using sudo to raise privileges only when it is absolutely necessary.
Next, you can limit the maximum number of authentication attempts for a particular login session by configuring the following:
MaxAuthTries 3A standard value of 3 is acceptable for most configurations, but you may want to set it higher or lower depending on your own risk threshold.
If necessary, you can also set a reduced login grace period, which is the time a user has to complete authentication after the initial connection to your SSH server:
LoginGraceTime 20The configuration file specifies this value in seconds.
Setting this value to a lower value helps avoid certain denial of service attacks where several authentication sessions are kept open for an extended period.
If you have configured SSH keys for authentication, rather than using passwords, disable SSH password authentication to prevent leaked user passwords from allowing an attacker to connect. We are going to leave the parameter on yes as long as the SSH keys are not used.
PasswordAuthentication yesAs an additional hardening measure related to passwords, you can also disable authentication with empty passwords. This will prevent connections if a user's password is set to an empty or blank value:
PermitEmptyPasswords noIn the majority of use cases, SSH will be configured with public key authentication as the only authentication method used. However, the OpenSSH server also supports many other authentication methods, some of which are enabled by default. If these are not required, you can disable them to further reduce the attack surface of your SSH server.
#security #linux