
Welcome, everyone, to this workshop. This course is designed to immerse you in the fascinating world of cybersecurity through practical exercises that will allow you to understand and master the key concepts of network security.
What You Are Going to LearnDuring this workshop, we are going to explore several aspects of network security through practical exercises. You will start with simple tasks to become familiar with the basic tools and concepts, then you will move on to more complex exercises that will challenge you and improve your skills.Why Cybersecurity?In our increasingly connected world, cybersecurity has become an essential skill. Cyberattacks are multiplying and becoming ever more sophisticated, affecting individuals, companies and even governments. Understanding how to protect networks and data is crucial for anyone working with digital technologies.How the Exercises Are OrganizedStep by Step: Each exercise is presented with clear and detailed instructions so that you can follow them easily.Progress Gradually: Start with the basic exercises to become familiar with the tools, then move on to the more complex tasks.Answers and Solutions: At the end of each exercise, you will find a "spoiler" section where you can check your results and understand the solutions.Dive Into the ActionWe encourage you to be curious and to explore the different facets of each exercise; research on the Internet is strongly encouraged. Ask questions, discuss with people you know if possible, and above all, enjoy yourself while learning. Cybersecurity is an exciting and constantly evolving field, and these practical activities are designed to give you a glimpse of what awaits you in the professional world.
So get your computers ready, open your minds, and let us dive together into the world of cybersecurity. Happy learning and good luck.
Contents and shortcuts
1. Using nslookup for reconnaissance
2. Information gathering with WHOIS
3. Using netstat to monitor connections
4. Network traffic analysis with Wireshark
5. Creating a security policy with a firewall
6. Securing a web server with a self-signed HTTPS certificate
7. Obtaining a trusted HTTPS certificate with Certbot and Let's Encrypt

1. Using nslookup for reconnaissance
Objective : Learn to use the nslookup tool to obtain information about DNS servers and the IP addresses associated with domain names.
Equipment required:
- A computer with Internet access
Steps:
1. Opening the Terminal/Command Prompt:
- On Windows, open the Command Prompt (CMD).
- On macOS or Linux, open the Terminal.
2. Using nslookup:
- Type nslookup followed by a domain name to obtain information about the DNS servers.
3. Analyzing the results:
- Note the IP address returned by nslookup.
- Try it with several domain names to see the different answers.
4. Looking up mail servers (MX):
- Use nslookup to find the mail servers of a domain.
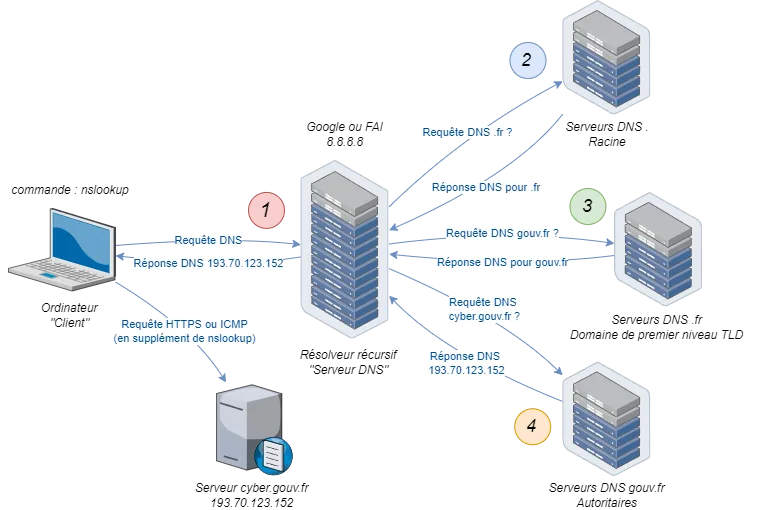
Example commands:
- nslookup cyber.gouv.fr to obtain the IP address associated with the domain.
- nslookup -type=mx cyber.gouv.fr to obtain the MX records of the domain.
2. Information gathering with WHOIS
Objective : Learn to use the WHOIS tool to obtain information about the registration of domain names or IP addresses.
Equipment required:
- A computer with Internet access
Steps:
1. Accessing a WHOIS service:
- Use an online service such as whois.domaintools.com.
2. Looking up information:
- Enter the domain name in the search field of the WHOIS service.
- Example domain name: cyber.gouv.fr
3. Analyzing the results:
- Note the information about the owner of the domain, the registration and expiry dates, and the name servers.
4. Checking several domains:
- Try it with different domain names to compare the information provided by WHOIS.
3. Using netstat to monitor connections
Objective : Learn to use netstat to monitor network connections and open ports.
Equipment required:
- A computer with Internet access
Steps:
1. Opening the Terminal/Command Prompt:
- On Windows, open the Command Prompt (CMD).
- On macOS or Linux, open the Terminal.
2. Using netstat:
- Type netstat to display all active network connections.
3. Use additional options for detailed information:
- netstat -a to display all connections and listening ports.
- netstat -n to display addresses and port numbers in numeric format.
- netstat -o (Windows) to display the process ID associated with each connection.
4. Analyzing the results:
- Note the active connections, the local and remote addresses, and the ports used.
- Identify whether there are any suspicious or unauthorized connections.
Example commands:
- netstat -ano to display all network connections and ports in numeric format with the associated process ID.
- netstat -anp tcp to filter and display only TCP connections.
4. Network traffic analysis with Wireshark
Objective : Learn to capture and analyze network traffic in order to detect anomalies or potential attacks.
Equipment required:
- A computer with Internet access
- Wireshark (free and open source)
Steps:
1. Installing Wireshark: Download and install Wireshark from their site.
2. Capturing traffic:
- Open Wireshark and select the network interface to monitor.
- Click "Start" to begin the traffic capture.
3. Generating traffic:
- Open a web browser and visit a few websites to generate traffic.
4. Analyzing the traffic:
- Return to Wireshark and stop the capture.
- Use filters to find specific packets, for example http or dns.
- Examine the details of the captured packets to understand the network communication.
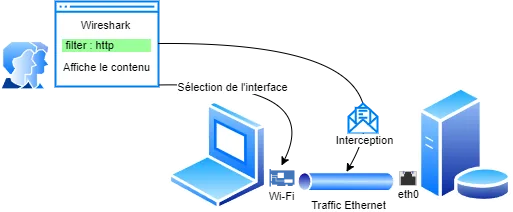
Example of analysis:
- Use the http.request filter to see only the HTTP requests sent from your workstation.
- Identify an HTTP packet and examine the headers and the content.
5. Creating a security policy with a firewall
Objective: Configure a firewall to block or allow specific connections and understand the role of the firewall in network security.
Equipment required:
- A computer with Internet access
- A software firewall (for example, Windows Firewall)
Steps:
1. Opening the firewall: On Windows, go to "Control Panel" > "System and Security" > "Windows Defender Firewall".
2. Creating a rule:
- Click "Advanced settings" to open the firewall rule management console.
- Create a new inbound or outbound rule.
3. Configuring the rule:
- Choose to block a specific application or a port (for example, port 80 for HTTP).
- Name and save the rule.
Testing the rule:
- Try to reach a website through a browser to check that the rule works.
- Adjust the rules and observe the effects on network traffic.
Example rule:
Block port 80 and try to reach an HTTP website. You should see that access is denied, showing the effectiveness of your firewall rule.
6. Securing the web with a self-signed HTTPS certificate
Objective : Learn to generate and install a self-signed HTTPS certificate to secure a website on the local network.
Equipment required:
A web server (Apache/Nginx) installed on a local computer or on a test server
Prerequisites:
Administrator access to the web server
Steps:
1. Generating the self-signed certificate:
- Use OpenSSL to generate a private key and a self-signed certificate.
Command:
openssl req -x509 -nodes -days 365 -newkey rsa:2048 -keyout /etc/ssl/private/selfsigned.key -out /etc/ssl/certs/selfsigned.crt- Follow the instructions to fill in the information requested (domain name, and so on).
2. Configuring the web server (Apache):
- Edit the site configuration file to enable HTTPS with the self-signed certificate.
Example configuration for Apache (/etc/apache2/sites-available/default-ssl.conf):
<VirtualHost *:443>
    ServerAdmin webmaster@localhost
    DocumentRoot /var/www/html
    SSLEngine on
    SSLCertificateFile /etc/ssl/certs/selfsigned.crt
    SSLCertificateKeyFile /etc/ssl/private/selfsigned.key
    <FilesMatch "\.(cgi|shtml|phtml|php)$">
        SSLOptions +StdEnvVars
    </FilesMatch>
    <Directory /usr/lib/cgi-bin>
        SSLOptions +StdEnvVars
    </Directory>
    BrowserMatch "MSIE [2-6]" \
        nokeepalive ssl-unclean-shutdown \
        downgrade-1.0 force-response-1.0
    BrowserMatch "MSIE [17-9]" ssl-unclean-shutdown
</VirtualHost>
3. Enabling the site and the SSL module (Apache):
Enable the SSL site and the SSL module:
sudo a2enmod ssl
sudo a2ensite default-ssl
sudo systemctl restart apache2
4. Checking the installation:
Open the site in your browser at https://<saisir_IP_de_votre_serveur_web> and, when the security warning appears, accept the self-signed certificate by continuing.
7. Obtaining a trusted HTTPS certificate with Certbot and Let's Encrypt
Objectives:
- Learn to configure a secure web server using HTTPS to protect data in transit.
- Learn to use Certbot to obtain and install a valid HTTPS certificate from Let's Encrypt.
Prerequisites:
- A domain name pointing to the server
- Port 80 (HTTP) and 443 (HTTPS) open on the server
Equipment required:
- A computer with administrator rights
- A local web server (for example, XAMPP, WAMP, or an Apache/Linux server)
- Certbot, to obtain free SSL/TLS certificates from Let's Encrypt
Steps:
1. Installing the web server:
- Install a local web server such as LAMP, XAMPP or WAMP.
- Make sure the server is running by visiting http://localhost in your browser.
2. Obtaining an SSL/TLS certificate:
- Download and install Certbot from their official site.
- Follow the instructions specific to your web server to obtain a free SSL/TLS certificate.
3. Configuring the web server for HTTPS:
- Edit your web server configuration to use the SSL/TLS certificate obtained.
- Restart the web server to apply the changes.
4. Testing the configuration:
- Open the site in your browser at https://<IP_de_votre_serveur_web>
- Check that the connection is secure (a padlock should appear in the browser address bar).
Well done
Congratulations on completing these web security and network reconnaissance exercises. You have now acquired essential practical skills for securing websites and analyzing networks, which forms a solid basis for making progress in cybersecurity.
Key points covered
- Network reconnaissance with simple tools: You have used basic tools such as nslookup, whois, ping, tracert, ipconfig, and netstat to obtain information about networks and domains.
- Securing with self-signed certificates: You have learned to generate and install self-signed HTTPS certificates to protect communications on a local server.
- Using Let's Encrypt and Certbot: You have deployed valid SSL/TLS certificates to secure a publicly accessible website, while automating the renewal of the certificates.
Next steps
These basic security and reconnaissance skills are only the beginning of your journey in the field of cybersecurity. The next activities will focus on more advanced aspects, such as:
- Secure development: Learning to build security practices into the software development cycle (DevSecOps).
Exercise: Code analysis to detect and fix vulnerabilities.Exercise: Using static and dynamic analysis tools to improve application security. - Exercise: Code analysis to detect and fix vulnerabilities.
- Exercise: Using static and dynamic analysis tools to improve application security.
- Pentesting and ethical hacking: Going further into penetration testing techniques to identify and exploit vulnerabilities in systems.
Exercise: Scanning and vulnerability analysis with tools such as Nmap and Nessus.Exercise: Carrying out SQL injection and XSS attacks in a controlled environment.Exercise: Using Metasploit to exploit flaws and test system defenses. - Exercise: Scanning and vulnerability analysis with tools such as Nmap and Nessus.
- Exercise: Carrying out SQL injection and XSS attacks in a controlled environment.
- Exercise: Using Metasploit to exploit flaws and test system defenses.
- Incident detection and response: Developing the skills to detect, analyze and respond effectively to security incidents.
Exercise: Configuring intrusion detection (IDS) and alerting systems.Exercise: Log analysis and response to a simulated incident.Exercise: Developing and implementing incident response plans. - Exercise: Configuring intrusion detection (IDS) and alerting systems.
- Exercise: Log analysis and response to a simulated incident.
- Exercise: Developing and implementing incident response plans.
An invitation to continue
We encourage you to continue exploring and practicing these skills. Cybersecurity is a constantly evolving field, and staying up to date with new techniques and tools is crucial in order to become a competent and effective professional.
Stay tuned for the coming sessions, where we will go deeper into secure development and ethical hacking. By continuing to broaden your knowledge and skills, you will be better prepared to protect systems and information against the growing threats of cyberspace.
Thank you and best of luck
Thank you for your active participation and your commitment in these activities. We look forward to seeing you make further progress on your cybersecurity path. See you very soon for the next technical and security adventures.