
HSRP stands for Hot Standby Routing Protocol. It is a Cisco proprietary protocol that provides high availability and redundancy. It allows a set of router interfaces to work together and presents them as a single virtual router (default gateway) to the clients on a network.
HSRP uses a virtual MAC address and an IP address shared by a group of configured routers. It uses the Active and Standby concept for redundancy. The active router is the preferred router for forwarding network packets. The standby router is the router that takes over the routing responsibilities if the active router fails.
In this article, we will learn how to configure HSRP on Cisco routers.
Before configuring HSRP, you must take the following elements into account:
The following interface configuration commands are used to define the characteristics for electing the active and redundant routers.
standby priority
standby preempt
standby track
In addition, these commands are also used to define the behavior regarding when a new active router will take over the routing responsibilities.
The active and standby routers can be chosen using the priority value. If preemption is enabled, the router with the highest priority will become the active router. If the priority values of two or more routers are equal within a group of configured routers, the current active router will not be changed. The priority value can range from 1 to 255. The highest number means the highest priority and the greater the chances of becoming the active router. The priority of a router can change dynamically if an interface is configured with the standby track command and another interface of the router goes down.
Configuring HSRP step by step
To configure HSRP on Cisco routers, we will use the following topology. You can use the Cisco Packet Tracer simulator or GNS3 to configure HSRP.
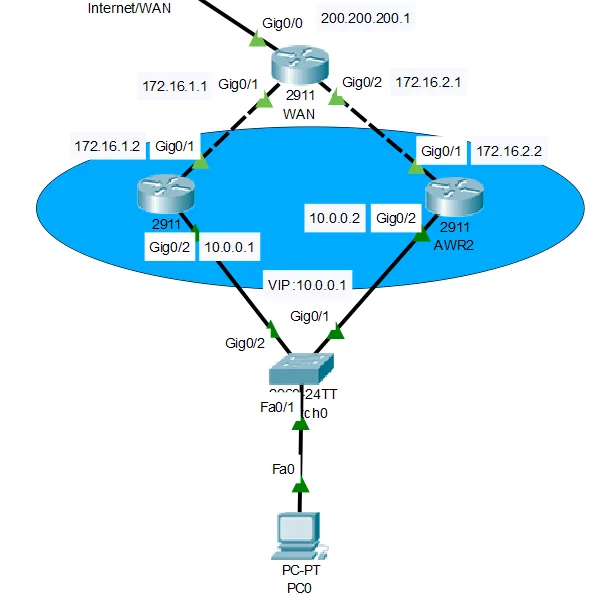
1. On the WAN router (often the Internet access), run the following commands to configure the appropriate IP addresses on the Gig0/0, Gig0/1 and Gig0/2 interfaces.
WAN(config)#interface Gig0/0
WAN(config-if)#ip 200.200.200.1 255.255.255.0
WAN(config-if)#no shutdown

WAN(config)#interface Gig0/1
WAN(config-if)#ip address 172.16.1.1 255.255.255.0
WAN(config-if)#no shutdown

WAN(config)#interface Gig0/2
WAN(config-if)#ip address 172.16.2.1 255.255.255.0
WAN(config-if)#no shutdown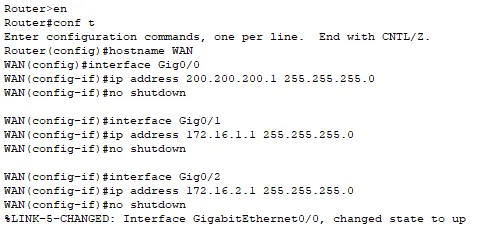
2. Once you have configured the appropriate IP addresses, run the following commands to configure the RIP version 2 routing protocol.
WAN(config) #router
WAN(config-router)#version 2
WAN(config-router)#network 172.16.1.0
WAN(config-router)#network 172.16.2.0
WAN(config-router)#network 200.200.200.0
WAN(config-router)#no auto-summary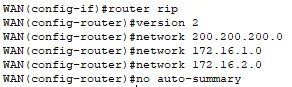
Once you have configured the IP addresses and the routing on the WAN router, move on to the AW-R1 router. This router will then act as the active router.
1. Run the following commands to configure the IP address on the Gig0/1 interface and then on the Gig0/2 interface.
AW-R1(config)#interface Gig0/1
AW-R1(config-if)#ip address 172.16.1.2 255.255.255.0
AW-R1(config-if)#no shutdown

AW-R1(config)#interface Gig0/2
AW-R1(config-if)#ip address 10.0.0.1 255.255.255.0
AW-R1(config-if)#no shutdown
2. Run the following command to define a group number (1-4096) and set 10.0.0.150 as the virtual IP address.
AW-R1(config-if)#standby 1 ip 10.0.0.103. Then the following commands to set the priority value, to enable preemption and to define the tracked interface.
AW-R1(config-if)#standby 1 priority 101
AW-R1(config-if)#standby 1 preempt
AW-R1(config-if)#standby 1 track Gig0/1
4. The following commands to configure RIP version 2 routing.
AW-R1(config-if)#router rip
AW-R1(config-router)#version 2
AW-R1(config-router)#network 172.16.1.0
AW-R1(config-router)#network 10.0.0.0
AW-R1(config-router)#no auto-summary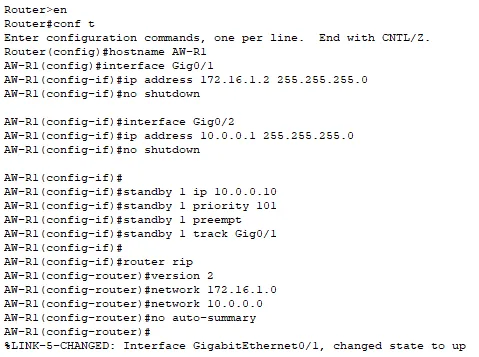
Now, move on to the AW-R2 router in standby and run the following commands. On this router, we will set the priority value to 99 (lower than the active router).
AW-R2(config)#interface Gig0/1
AW-R2(config-if)#ip address 172.16.2.2 255.255.255.0
AW-R2(config-if)#no shutdown

AW-R2(config-if)#interface Gig0/2
AW-R2(config-if)#ip address 10.0.0.2 255.255.255.0
AW-R2(config-if)#no shutdown

AW-R2(config-if)#standby 1 ip 10.0.0.10
AW-R2(config-if)#standby 1 priority 99
AW-R2(config-if)#standby 1 preempt
AW-R2(config-if)#standby 1 track Gig0/1

AW-R2(config-if)#router rip
AW-R2(config-router)#version 2
AW-R2(config-router)#network 172.16.2.0
AW-R2(config-router)#network 10.0.0.0
AW-R2(config-router)#no auto-summary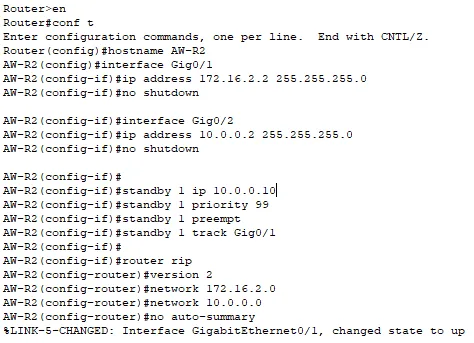
Once you have configured the HSRP routing protocol on the active and standby routers, it is now time to check your configuration. To do this, run the following command on the master router and examine the output.
AW-R1#show standby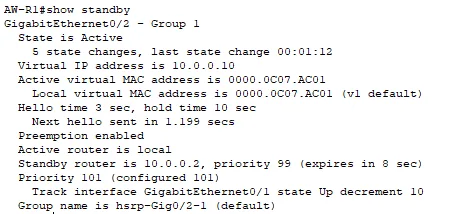
You can see that the AW-R1 router is currently acting as the active router because it has a higher priority (101) than the AW-R2 router (99).
To explain what happens when the active router goes down, we are going to shut down the Gig0/0 interface on the AW-R1 router. To do this, run the following commands:
AW-R1(config) #Gig0/2
AW-R1(config-if)#shutdown
Now, move on to the AW-R2 router and run the following command:
show standby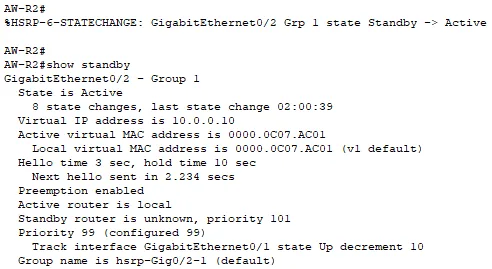
You can see that the AW-R2 router becomes the active router and takes over the routing responsibilities as soon as the interface of the AW-R1 router goes down.
The destination network can still be reached because the clients will use the virtual IP address 10.0.0.10 as the default gateway. When the R01 router goes down, the AW-R2 router takes over the routing responsibilities.
That is what the HSRP protocol does.
In this article I have explained how to configure HSRP on Cisco equipment and how this can help provide redundancy.
Feel free to leave a comment if needed! :)