
Let's play a word association game. I will say something and you say the first word that comes to mind.
Internet security.
Did you say fire - wall? I think I would have. When we think about securing our devices at the network level, we think about perimeters. Those perimeters are defined and protected by firewalls, mainly at the hardware level, with specialized networking devices designed to handle that particular task on our networks. Today we are here to talk about another layer of firewalling that you can and should be using in your environments. Yes, we really are talking about the Windows Firewall. Stop laughing, this is serious.
It is easy to make fun of the Windows Firewall based on its history. Back in the days of Windows XP and Server 2003, it was fairly useless and caused far more headaches than it solved. In fact, those feelings were so common that even today I still find many companies that disable the Windows Firewall completely on all of their domain-joined systems by default. If you ask them why, there is usually no specific reason for doing it - it has always been that way or it is in our written security policy are the standard answers. That is a problem, because the Windows Defender Firewall with Advanced Security (WFAS) that exists in today's Windows operating systems is far more robust and advanced than ever before, and can absolutely be used to improve your security architecture. I would go so far as to say that it is quite ridiculous to disable WFAS on a current operating system, unless you have a very good and very specific reason for doing so.

Three Windows Firewall administration consoles
First of all, it is important to know that there are three different consoles from which you can configure Windows Firewall settings. Two of these consoles are redundant with each other, and the third is much more capable than the others. Let's take a look.
Windows Defender Firewall (Control Panel)
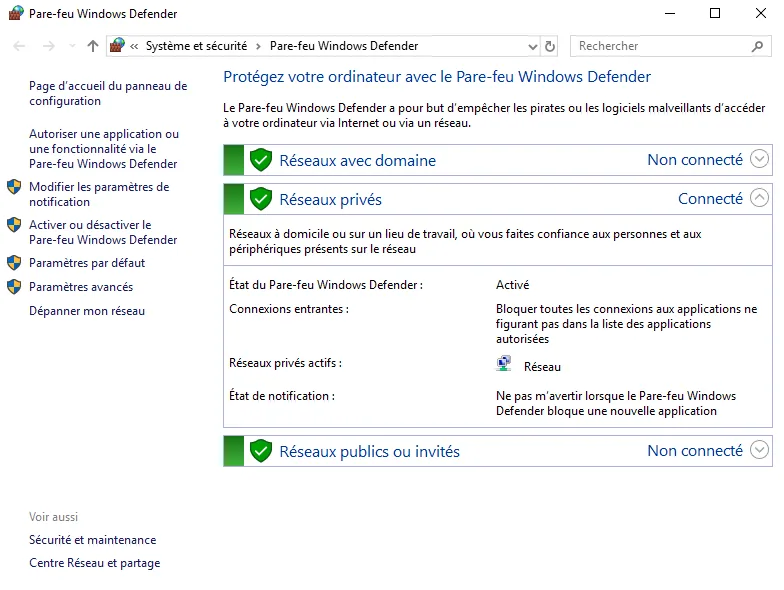
When you try to launch an application or a setting in Windows Server 2019, it is generally quicker to simply click the Start button and then type a word related to the task you are trying to accomplish. In my case, I clicked Start and typed the word firewall. The best matching option that came up first in my search results was Windows Defender Firewall, so I clicked it.
It is worth noting that this link opens the Windows Firewall configuration console from the Control Panel, the traditional way of defining system settings. This console is still there and fully capable of handling the basic firewall functions, such as turning the Windows Firewall on or off, but since this tool lives in the Control Panel, we have to assume that it is not in fact the tool Microsoft intends us to use. Remember that all the new configuration features have been migrated to the Windows Settings screens, rather than to the older Control Panel:
Firewall and network protection (Windows Security settings)
While the Control Panel-based tools have always been the right place to make these changes in previous versions of the operating system, we already know that there are many Windows Defender options stored in Windows Settings. Could it be that Windows Defender Firewall configuration settings are also stored in the Windows Security section of Settings?
Yes, there certainly are. Open Windows Settings and click Update and security, then Windows Security. You have been here before: this is the screen that gives a brief summary of the Windows Defender components. Sure enough, there is one here called Firewall and network protection. Click that button and you will be taken to a new configuration platform for Windows Firewall functions that did not exist in earlier versions of Windows Server:
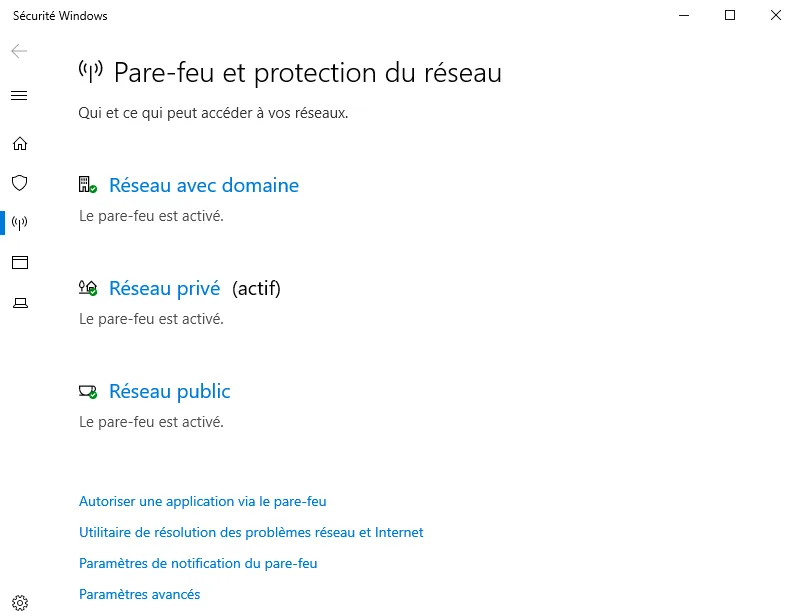
Clicking any of the links provided here will open additional configuration options. For example, if you want to quickly enable or disable certain firewall profiles (we will learn more about them shortly), you can click the profile you want to configure, such as the domain network profile, and from there easily turn off the firewall for that networking profile. Many companies disable the domain network profile on their computers, so that the firewall does not protect traffic that happens inside a corporate LAN.
While disabling the firewall is generally a bad idea, it is sometimes necessary to fit your business model:
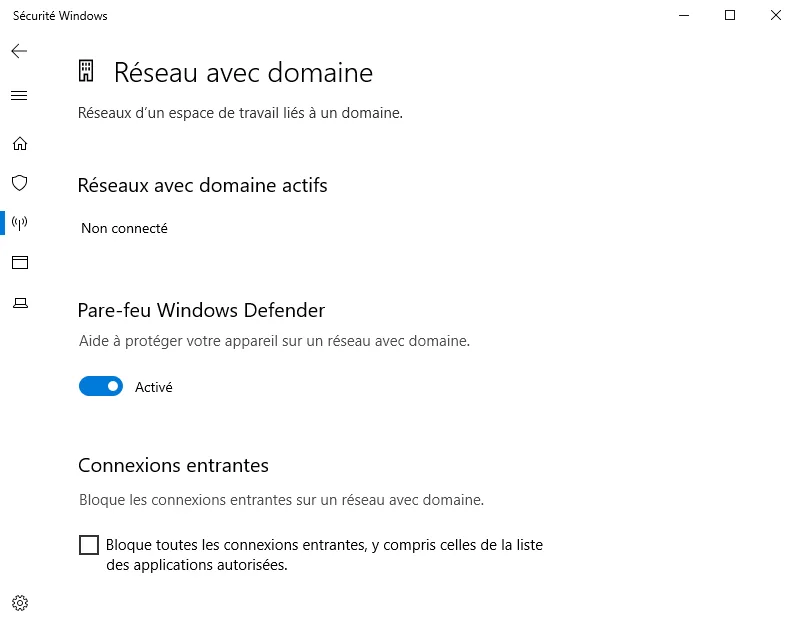
The firewall configuration screen available in Windows Settings is a good place to make simple, additional decisions about the Windows Defender Firewall, but this interface has limited capabilities. For any real use of the firewall's features or configuration….
Windows Defender Firewall with Advanced Security (WFAS)
If you are somewhat like me, you will not be satisfied with this information and will want to see what is happening under the hood, and so you will want a little more information than the basic Windows Firewall tools can give you. You can either click one of the advanced settings links shown in the previous screenshots, or simply open the command prompt or the Start | Run prompt and type wf.msc.
Either of these will launch the full WFAS administration console:
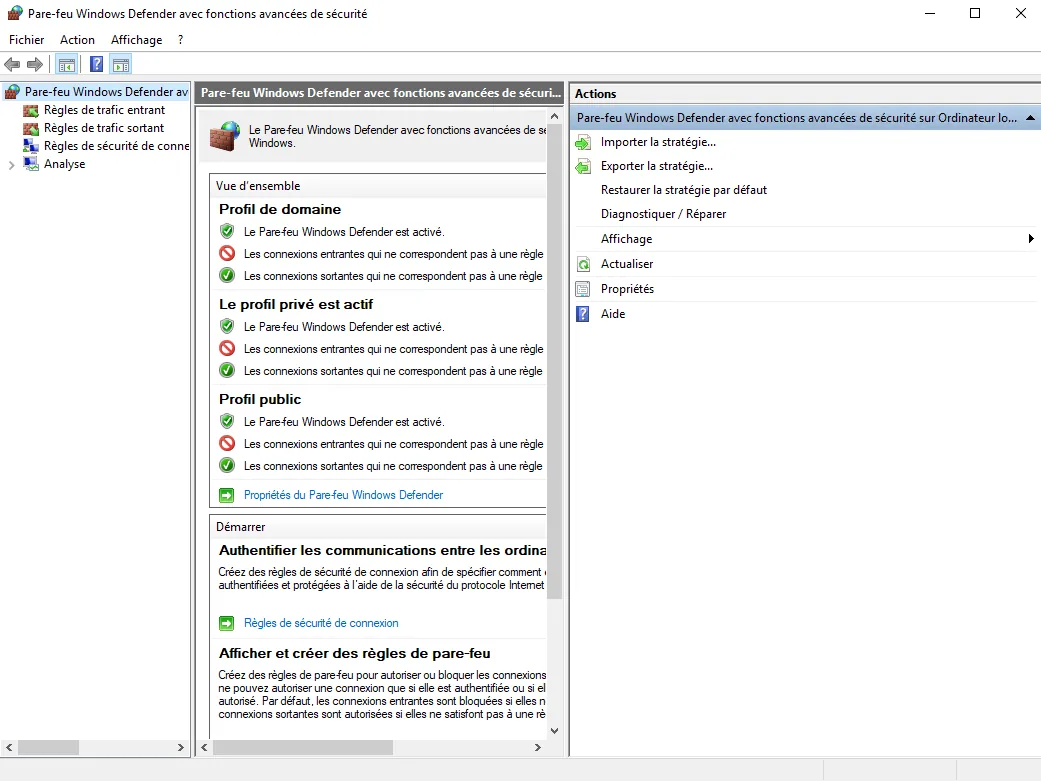
Here you can see much more detailed information about the activity and the rules that are in play with the Windows Firewall, and make more precise adjustments to your allows and blocks. There is also a monitoring section where you can view the rules that are actively engaged, including connection security rules. This section is important because it highlights the fact that WFAS does much more than block network traffic. It is not only a firewall, it is also a connectivity platform. If you plan to use IPsec for network traffic encryption, whether native IPsec inside your network or through the DirectAccess remote access technology, you will see rules populated in this section that are the definitions of those IPsec tunnels. The Windows Firewall is in fact responsible for making those encrypted connections and tunnels happen. This is far more advanced than the Windows Firewall of old.
Three different firewall profiles
When a network card on a computer or a server is connected to a network, the Windows Firewall assigns that connection one of three different profiles. You have probably already interacted with this decision process without even realizing it. When you connect your laptop to the Wi-Fi at your local coffee shop, has Windows asked you whether you were connecting to a home, work, or public network? That is your Windows Firewall asking which profile you want to assign to the new network connection. The reason you can assign NICs and network connections to different firewall profiles is so that you can assign different access rules and criteria for what is allowed or not on those different profiles. In effect, it is asking you how much do you trust this network? For example, when your laptop is connected to the corporate network, you can probably be a little more relaxed than when that same laptop is connected in a hotel across the country. By assigning more intense firewall rules to the profile that is active when you are at the hotel, you build higher walls for attackers to deal with when you are working on that public internet. Let's take a look at the three profile types available, with a quick description of each:
- Domain profile: this is the only one you cannot choose to assign. The domain profile is only active when you are on a domain-joined computer that is currently connected to a network on which a domain controller for your domain is reachable. So for any corporate machine inside the corporate network, you can expect the domain profile to be active.
- Private profile: when you connect to a new network and are prompted to choose where you are connected, if you choose Home or Work, that connection will be assigned the private profile.
- Public profile: when prompted, if you choose Public, then of course the public firewall profile is assigned to you. In addition, if you are not prompted for some reason, or if you do not choose an option at all and simply close the window asking what to assign to your new connection, this public profile will be the default profile given to any connection that does not already have a different profile assigned. In the most recent versions of Windows (particularly in Win10), you generally do not get the prompt asking what kind of network this is; instead, you get a prompt asking whether or not you want to allow your computer to communicate with other devices on the new network. In fact, it is still the same prompt, and the decision you make at that prompt will assign your connection to the public or the private firewall profile.
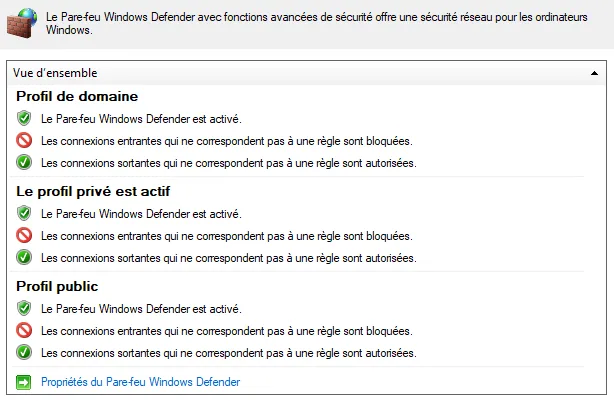
Each network connection is assigned its own profile definition, so you can certainly have more than one firewall profile active at the same time on the same system. For example, my Awoui-RA01 server is connected both to the corporate network and to the public internet. In WFAS, you can see that the domain profile and the public profile are both active:
Creating a new inbound firewall rule
We now know that the real meat and potatoes of the Windows Firewall is inside the WFAS console, so let's use WFAS to build ourselves a new rule. On this Awoui-RA01 server, I have enabled RDP access so that I can manage this server more easily from my desk. However, by enabling RDP, I have now allowed access from all networks to this server. That means I can RDP to Awoui-RA01 from inside the network, but I can also RDP to Awoui-RA01 from the internet, because it is a remote access server and happens to be connected directly to the internet. That is a big problem, because now any Yahoo on the internet could potentially find my server, find the RDP login prompt, and try to brute-force their way into Awoui-RA01.
To mitigate this problem, I want to remove RDP on my external network card. I want it to stay active on the inside so that I can keep accessing the server from my desk, but is there a simple way inside WFAS to create a firewall rule that blocks RDP access only from the outside? Yes, there certainly is.
Open wf.mscto launch Windows Defender Firewall with Advanced Security and go to the Inbound Rules section, and you will see all the existing inbound firewall rules that exist on this server (there are many rules listed here even if you have never visited this console before; those rules are installed with the operating system).
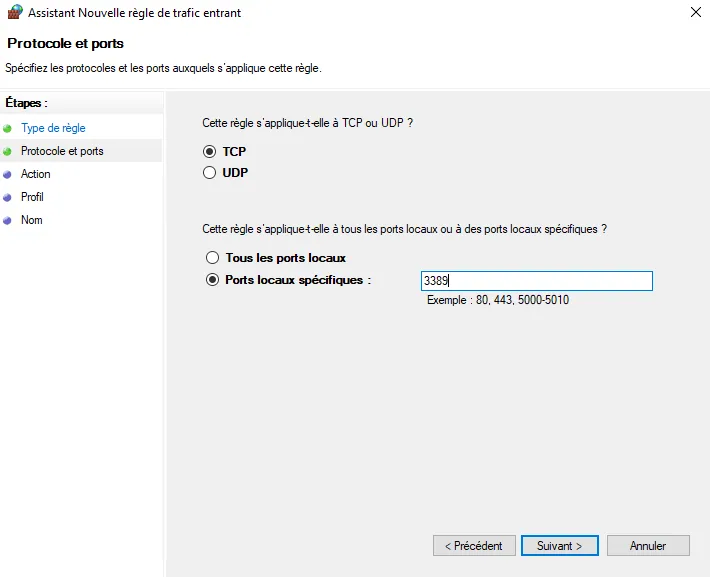
Right-click Inbound Rules and choose New Rule… This launches a wizard from which we will create our new firewall rule. The first screen is where we identify the type of rule we want to create. You can create a rule that modifies traffic for a particular program, or you can look through a list of predefined ones. However, I like to know exactly what my rule is doing because of the way I defined it, not because of a pre-existing protocol definition, and I know that RDP runs on TCP port 3389. So I am going to choose port on this screen, and after clicking Next, I will set 3389 as the specific port I want to modify:
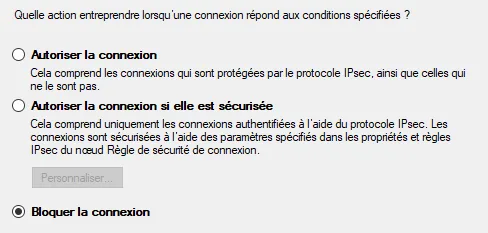
Our third step is to decide whether we want to allow or block this particular port. There is a third option listed to allow the connection only if it is authenticated by IPsec, which is a powerful option, but it requires already having IPsec established in our network. Because of that requirement, this option does not apply to most people. For our example, RDP is already working, but we want to block it on one of the network cards, so I am going to choose Block the connection:
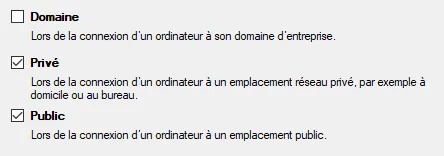
However, we do not want to block RDP for all the network cards, so this next screen is very important. Here we need to go back to our knowledge of the firewall profiles we discussed. Remember that internal NICs connected to our domain network will be assigned the domain profile. But any network card that is not connected to an internal network where a domain controller resides will have the public or private profile active.
If we want to disable RDP only on the external network card, we need this rule to be active only for the private profile and the public profile. But in case we add more NICs to this server in the future on which we want to make sure that RDP access is not possible, we will leave both Public and Private checked, to provide better security for the future. Be sure to uncheck the domain profile. Otherwise you will block RDP access completely, and if you are currently using RDP to connect to this server, you will lock yourself out and will not be able to reconnect:
And now we simply create a name for our new rule, and we are done. Our ability to RDP into this server from the internet has been immediately disabled, and we can rest much more easily tonight.
Creating a rule to allow pings (ICMP)
Very often, I have to create an allow or block rule for ICMP. In other words, I often find myself having to adjust the firewall on servers in order to enable or disable their ability to respond to ping requests. You have probably noticed with newer server operating systems that it is quite normal for the firewall to automatically block pings (ICMP) out of the box. That is a problem for environments where ping is the standard method of testing whether an IP address is used or available. You may be laughing, but believe me, there are still many IT administrators who do not keep track of the IP addresses they have used on their networks, and when faced with the need to set up a new server and decide which IP address to give it, they simply start pinging IP addresses on their network until they find one that times out. I have seen this so many times. While this is obviously not a good way to manage IP addresses, it happens. Unfortunately, this method runs into big problems, because most new Windows installations are designed to block ICMP responses out of the box, which means you can ping an IP address and get a timeout, but there could in fact be a server running on that IP address.
So, back to the point. You may need to enable ICMP on your new server so that it responds when someone tries to ping it. When we need to create a new rule that allows pings to happen, we set up a rule as we did for RDP, but there is one big problem. On that very first rule type screen when creating the new rule, where you have to identify the kind of rule you are creating, there are no options or predefined entries for ICMP. I find this odd, because it is a very common rule type to put in place, but alas, choosing ICMP from the drop-down list would simply be too easy.
Instead, what you have to do is create a new inbound rule as we did for RDP, but on the very first screen for the rule type, make sure to select the Custom option.
Then leave the option selected to define this rule for All programs. Click next again, and you now have a drop-down list called Protocol type. This is the menu where you can set your new rule to manipulate ICMP traffic. As you can see in the following screenshot, you can choose ICMPv4 or ICMPv6, depending on what your network traffic looks like. My test lab is IPv4 only, so I am going to choose ICMPv4:
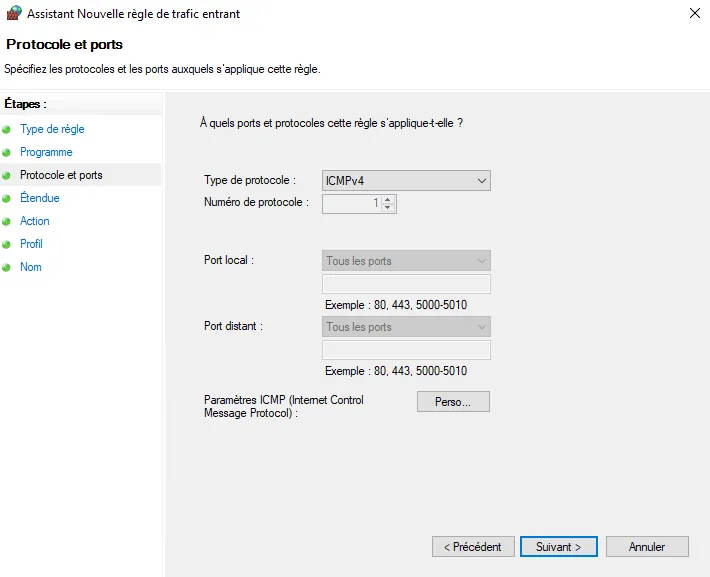
For the rest of the ICMP rule creation, follow the same procedures described when creating the RDP rule, choosing to allow or block this traffic, and for which firewall profiles. Once finished, your new ICMPv4 rule is applied immediately, and if you configured an Allow rule, your new server will now successfully respond to ping requests.
If you ever need to modify a rule or dig into more advanced properties of a firewall rule, back on the Inbound Rules screen you can right-click any firewall rule and go to Properties.
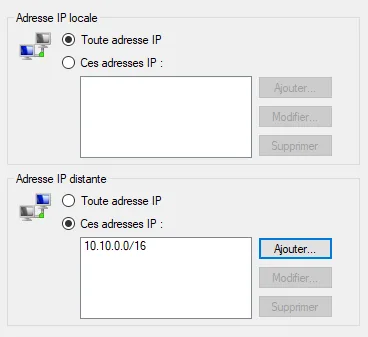
In these tabs, you have the ability to modify any of the criteria relating to the rule. For example, you can accommodate additional ports, you can change the firewall profiles it applies to, or you can even restrict the specific IP addresses this rule applies to using the Scope tab.
This lets you apply your firewall rule only to traffic coming from or going to a specific part of your network or a certain subset of machines. For example, here I have modified my Scope tab to reflect the fact that I only want this firewall rule to apply to traffic coming from the 10.10.0.0/16 subnet:
Managing WFAS with Group Policy
Managing firewall rules on your servers and clients can be a major step toward a more secure environment for your company. The best part? This technology is enterprise-class and free, because it is already built into the operating systems you are using. The only cost you have associated with firewalling at this level is the time it takes to put all of these rules in place, which would be an administrative nightmare if you had to implement your entire list of allows and blocks on each machine individually.
Thank goodness for the Group Policy Object (GPO). As with most settings and functions in the Microsoft Windows platform, putting in place a firewall policy that applies to everyone is child's play for your domain-joined machines. You can even split it into several policy sets, creating one Group Policy Object that applies firewall rules to your clients and a separate Group Policy Object that applies firewall rules to your servers, as you see fit. The point is that you can group many machines into categories, create a GPO rule set for each category, and apply it automatically to each machine using the powerful distribution capabilities of the GPO.
You are already familiar with creating GPOs, so go ahead and create one now that will contain firewall settings we can play with. Link and filter the GPO accordingly so that only the machines you want to have the settings actually get them. A good starting point might be a test organizational unit, so that you can make sure that any rules you are about to place in the Group Policy Object work well together and with all your other existing policies, before deploying the new policy to your production staff.
Once your new Group Policy Object has been created, right-click it from the Group Policy Management Console and click Edit…
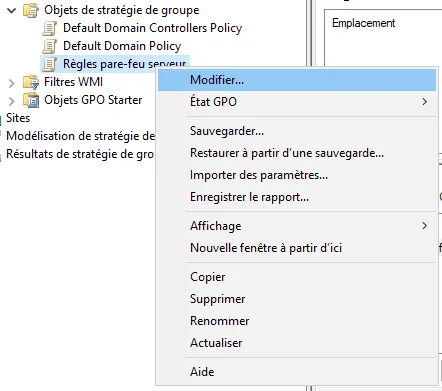
Now that we are looking inside this new Group Policy Object, all we have to do is work out where the right location is for us to create new firewall rules. When you look inside the rules on the local computer itself, everything is listed under a Windows Defender Firewall with Advanced Security header, and that is found in Computer Configuration | Policies | Windows Settings | Security Settings | Windows Defender Firewall with Advanced Security | Windows Defender Firewall with Advanced Security:
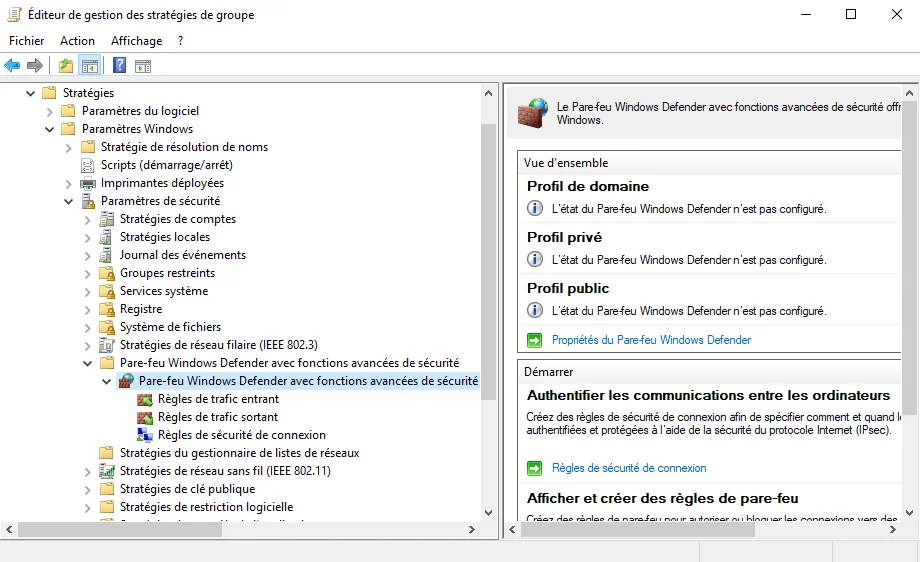
As you can see, this is also the place to go when you want to make sure that certain firewall profiles, or the Windows Firewall as a whole, are specifically enabled or disabled. So this is the same place you would go if you wanted to disable the Windows Firewall for everyone. By clicking the Windows Defender Firewall properties, you can determine the state of each firewall profile individually.
Once you have finished defining your profiles according to your needs, click OK and you are back in the WFAS part of the GPO. Just as in the local WFAS console, you have categories for inbound rules and outbound rules. Simply right-click Inbound Rules and click New Rule… in order to start creating a rule directly in this GPO. Follow the same wizard you already know from creating a rule in the local WFAS console, and when you are done, your new inbound firewall rule is displayed in the Group Policy Object.
This firewall rule is already making its way into Active Directory and installing itself on the computers and servers you defined in the policy's links and filtering criteria.