
When you create a new Debian- or Ubuntu-type server, you must carry out a few important configuration steps as part of the basic setup. These steps will increase the security and the usability of your server, and will give you a solid base for later actions.

Step 1 - Connecting over ssh
To connect to your server, you need to know the public IP address of your server. You will also need the password or - if you have installed an SSH key for authentication - the private key of the root user account. If you are not yet connected to your server, you can follow our guide on How to connect with SSH, which covers this process in detail.
Checking that the SSH service is working
systemctl status ssh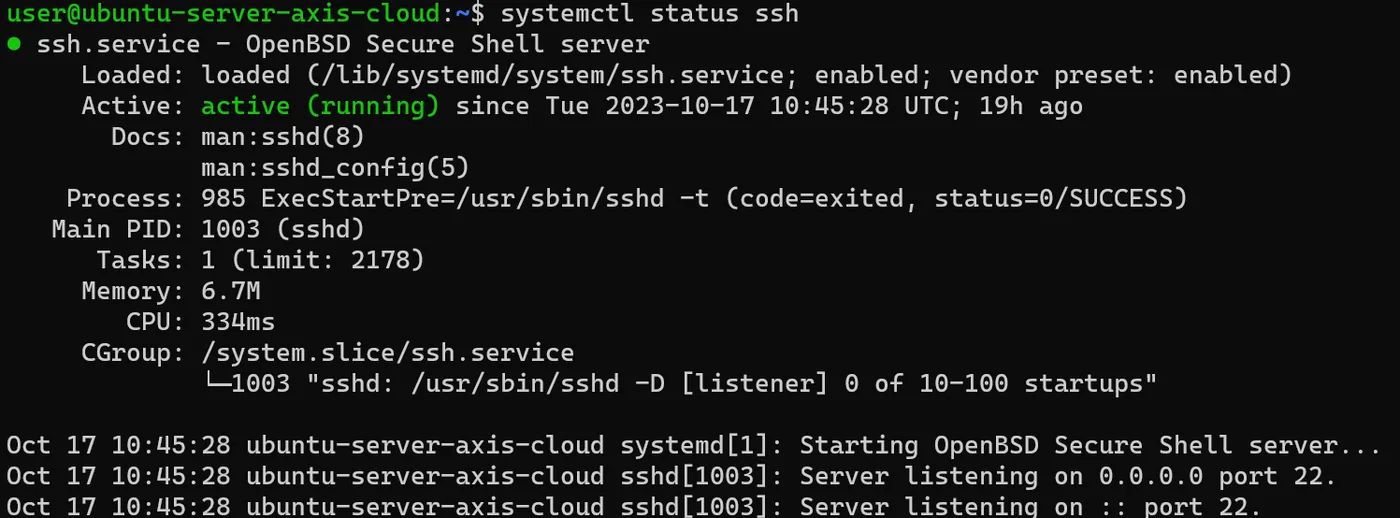
Noting down the IP address of your server
ip address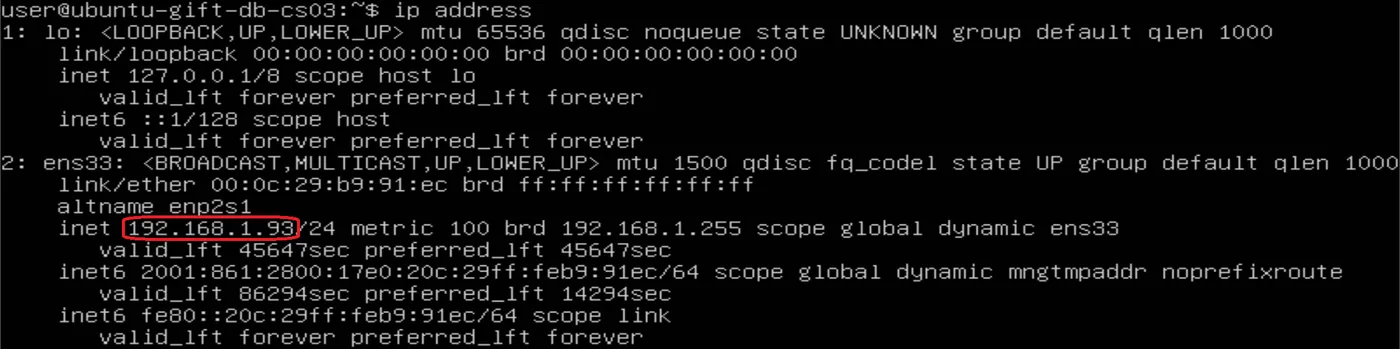
If you are not yet connected to your server over SSH, connect using the following command (replace the highlighted part of the command with the public IP address of your server):
Accept the warning about the authenticity of the host if it appears. If you are using password authentication, provide your root password to log in. If you are using an SSH key that is protected by a passphrase, you may be prompted to enter the passphrase the first time you use the key in each session. If this is the first time you log in to the server with a password, you may also be prompted to change the root password.
In case the password does not workSwitch to root on your serverFor Ubuntu: sudo su
For Debian: su -
2. Change the password of your userpasswd mon_username
About Root
The root user is the administrative user in a Linux environment, which has very broad privileges. Because of the elevated privileges of the root account, using it regularly is not advised. Indeed, part of the power inherent in the root account is its ability to make very destructive changes, even by accident.
The next step consists in setting up a new user account with reduced privileges for daily use. Later, we will teach you how to obtain elevated privileges only when you need them.
Step 2 - Creating a user
Once you are logged in as root, we are ready to add the new user account. In the future, we will log in to this new account instead of root.
This example creates a new user called sammy, but you should replace it with the user name that suits you:
A few questions will be asked of you, starting with the password of the account.
Enter a strong password and, if you wish, fill in the additional information. This is not mandatory and you can simply press ENTER in any field you want to skip.
Step 3 - Granting privileges
Now we have a new user account with ordinary account privileges. However, we sometimes need to carry out administrative tasks.
To avoid having to log out of our normal user and log back in as the root account, we can configure what are called superuser or root privileges for our ordinary account. This will allow our normal user to run commands with administrative privileges by placing the word sudo before each command.
To add these privileges to our new user, we must add the user to the sudo group. By default on Ubuntu, users who are members of the sudo group are allowed to use the sudo command.
Install the sudo package (if necessary)In case sudo is not installed, as on some Debian-based systems, you can do it like this:apt install sudo
As root, run this command to add your new user to the sudo group (replace the highlighted user name with that of your new user):
Now, when you are logged in as a regular user, you can type sudo before commands in order to carry out actions with superuser privileges.
Step 4 - Setting up the firewall
Ubuntu 20.04 servers can use the UFW firewall to make sure that only connections to certain services are allowed. We can very easily set up a basic firewall using this application.
Note: if your servers run on a Cloud or another system, you may be able to use the built-in firewalls instead of the UFW firewall. We recommend using only one firewall at a time, in order to avoid contradictory rules that can be hard to debug.
To install the ufw firewall:
Applications that communicate over the network can register their profiles in UFW when they are installed. These profiles allow UFW to manage these applications by name. OpenSSH, the service that now allows us to connect to our server, has a profile already registered in UFW.
You can see this by typing:
We must make sure that the firewall allows SSH connections so that we can log back in next time. We can allow these connections by typing:
You can check that SSH connections are still allowed by typing:
As the firewall currently blocks every connection except SSH connections, if you install and configure additional services, you will have to adjust the firewall settings to allow the traffic. You can learn a few common UFW operations in our guide to the UFW fundamentals.
After which, we can enable the firewall by typing:
Type y and press ENTER to continue. Now that the firewall is enabled, in the future you will have to add a new rule with ufw allow followed by the port number or the name of the rule in order to allow access to the server with a new protocol.
Step 5 - Enabling external access for your ordinary user
Now that we have a regular user for daily use, we must make sure that we can SSH directly into the account.
Note: until you have checked that you can log in and use sudo with your new user, we recommend staying logged in as root. That way, if you run into problems, you can solve them and make the necessary changes as root.
The process of configuring SSH access for your new user depends on whether the root account of your server uses a password or SSH keys for authentication.
If the root account uses password authentication
If you logged in to your root account using a password, then password authentication is enabled for SSH. You can reach your new user account by opening a new terminal session and using SSH with your new user name:
After entering your usual user password, you will be logged in. Remember that if you need to handle a command with administrative privileges, type sudo in front of it like this:
Your usual user password will be requested on the first use of sudo in each session (and periodically thereafter).
To strengthen the security of your server, we strongly recommend configuring SSH keys rather than using password authentication.
Follow our guide on Configuring SSH keys on Ubuntu 20.04 to learn how to configure key authentication.
If the root account uses SSH key authentication
If you logged in to your root account using SSH keys, password authentication is disabled for SSH. You will need to add a copy of your local public key to the new user's ~/.ssh/authorized_keys file in order to log in successfully.
As your public key is already in the ~/.ssh/authorized_keys file of the root account on the server, we can copy that file and the directory structure to our new user account within our existing session.
The rsync command is the simplest way to copy the files with the correct ownership and permissions. It copies the .ssh directory of the root user, preserves the permissions and changes the file owners, all in a single command. Be sure to change the highlighted parts of the command below so that they match your user name.
Note: the rsync command treats sources and destinations that end with a slash differently from those without a slash. When you use rsync below, make sure that the source directory (~/.ssh) does not carry a slash (check that you are not using ~/.ssh/). If you accidentally add a slash at the end of the command, rsync will copy the contents of the ~/.ssh directory of the root account into the home directory of the sudo user instead of copying the whole ~/.ssh directory structure. The files will be in the wrong place and SSH will not be able to find and use them.
- rsync --archive --chown=neo:neo ~/.ssh /home/neo
Now open a new terminal session on your local machine, and use SSH with your new user name:
- ssh neo@your_server_ip
You should be logged in to the new user account without using a password. Remember that if you need to handle a command with administrative privileges, type sudo in front of it like this:
- sudo command_to_run
Your usual user password will be requested on the first use of sudo in each session (and periodically thereafter).
What to do next?
At this stage, you have a solid base for your server. You can now install all the software you need on your server. -> Carry out the security hardening of access with the SSH protocol