
Thanks to the previous article on the History and introduction to the Windows firewall, we now know that the real meat and potatoes of the Windows firewall are found inside the WFAS console, so let's use WFAS to build ourselves a new rule. On this Awoui-RA01 server, I have enabled RDP access so that I can more easily manage this server from my desk. However, by enabling RDP, I have now allowed access from every network to this server. This means that I can RDP into Awoui-RA01 from inside the network, but I can also RDP into Awoui-RA01 from the Internet, because it is a remote access server and happens to be connected directly to the Internet. This is a big problem, because now any Yahoo on the Internet could potentially find my server, find the RDP logon prompt and try to brute-force their way into Awoui-RA01.
To mitigate this problem, I want to remove RDP on my external network card. I want it to stay active on the inside so that I can keep accessing the server from my desk, but is there a simple way inside WFAS to create a firewall rule that blocks RDP access only from the outside? Yes, there certainly is, and here is how to do it:
1. Launch the Windows firewall
Open wf.msc to launch Windows Defender Firewall with Advanced Security and go to the Inbound Rules section, and you will see all the existing inbound firewall rules that exist on this server (there are many rules listed here even if you have never visited this console before; these rules are installed with the operating system).
2. Create a new rule
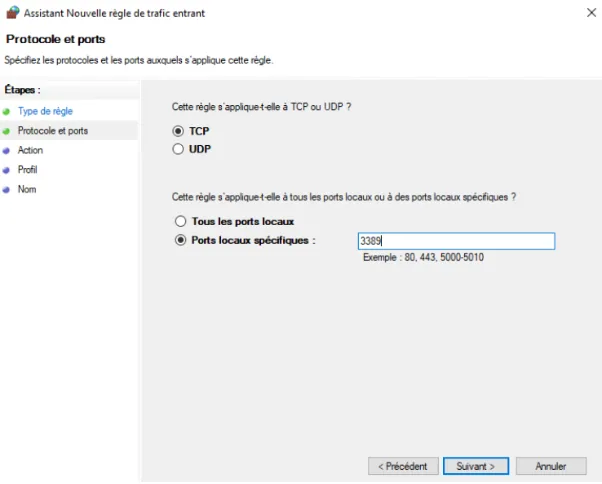
Right-click on Inbound Rules and choose New Rule… This launches a wizard from which we are going to create our new firewall rule. The first screen is where we identify the type of rule we want to create. You can create a rule that shapes the traffic for a particular program, or you can look through a list of predefined ones. However, I like to know exactly what my rule does because of the way I defined it, not because of a pre-existing protocol definition, and I know that RDP runs on TCP port 3389. So I am going to choose the port on this screen, and after clicking Next, I will set 3389 as the specific port I want to shape:
3. Allow or block the port
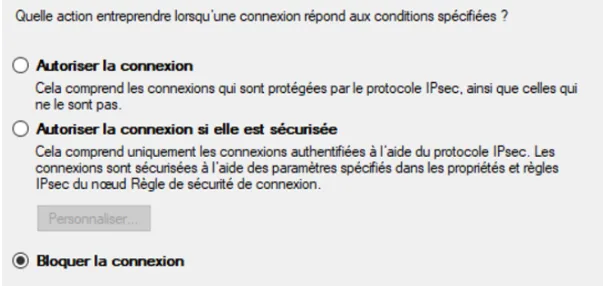
Our third step consists of deciding whether we want to allow or block this particular port. There is a third option listed to allow the connection only if it is authenticated by IPsec, which is a powerful option, but requires already having IPsec established in our network. Because of this requirement, this option does not apply to most people. For our example, RDP already works, but we want to block it on one of the network cards, so I am going to choose Block the connection:
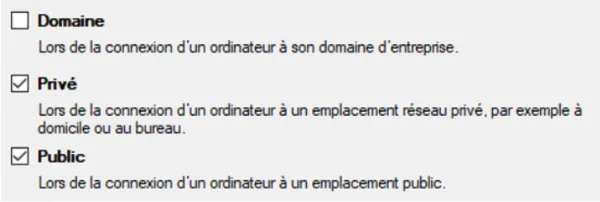
However, we do not want to block RDP for all the network cards, so this next screen is very important. Here, we need to refer back to our knowledge about the firewall profiles we talked about. Remember that the internal NICs connected to our domain network will be assigned the domain profile. But any network cards that are not connected to an internal network on which a domain controller resides will have public or private profiles active.
4. Disable RDP only on the external network card
If we want to disable RDP only on the external network card, we need this rule to be enabled only for the private profile and the public profile. But in case we add more NICs to this server in the future on which we want to make sure that RDP access is not possible, we will leave both Public and Private checked, to ensure better security for the future. Make sure you uncheck the domain profile! Otherwise, you will block RDP access entirely, and if you are currently using RDP to connect to this server, you will lock yourself out and will not be able to reconnect:
And now, we simply create a name for our new rule, and we are done! Our ability to RDP into this server from the Internet has been immediately disabled, and we can rest much easier tonight.
How to create a rule to allow pings (ICMP)
Very often, I have to create an allow or block rule for ICMP. In other words, I often find myself having to adjust the firewall on servers in order to enable or disable their ability to respond to ping requests. You have probably noticed with the newer server operating systems that it is quite normal for the firewall to automatically block pings (ICMP) out of the box. This is a problem for environments where ping is the standard method for testing whether an IP address is used or available. You may be laughing, but believe me, there are still many IT administrators who do not keep track of the IP addresses they have used on their networks, and when they are faced with the need to set up a new server and decide which IP address to give it, they simply start pinging the IP addresses on their network until they find one that times out! I have seen this so many times. Although this is obviously not a good way to manage IP addresses, it happens. Unfortunately, this method runs into big problems, because most new Windows installations are designed to block ICMP responses out of the box, which means that you can ping an IP address and get a timeout, but there could actually be a server running on that IP address.
So, back to the point. You may need to enable ICMP on your new server so that it responds when someone tries to ping it. When we need to create a new rule that allows pings to happen, we set up a rule as we did for RDP, but there is a big problem. On that very first rule-type screen when creating the new rule, where you have to identify the type of rule you are creating, there are no options or predefined settings for ICMP. I find this strange because it is a very common type of rule to set up, but alas, choosing ICMP from the drop-down list would simply be too easy.
1. Create a new rule
Instead, what you have to do is create a new inbound rule as we did for RDP.
2. Select the right rule type
But on the very first screen for the rule type, make sure you select the "Custom'' option. Then, leave the option selected to define this rule for “All programs”.
3. Protocol type
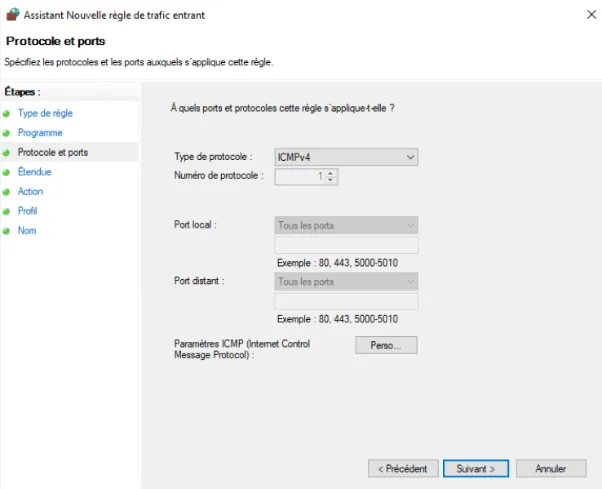
Click Next again, and you now have a drop-down list called Protocol type. This is the menu in which you can choose your new rule to manipulate ICMP traffic. As you can see in the following screenshot, you can choose ICMPv4 or ICMPv6, depending on what your network traffic looks like. My test lab is IPv4 only, so I am going to choose ICMPv4:
4. Finish creating the rule
For the rest of the ICMP rule creation, follow the same procedures described when creating the RDP rule, choosing whether to allow or block this traffic, and for which firewall profiles. Once finished, your new ICMPv4 rule is immediately applied, and if you set up an Allow rule, your new server will now successfully respond to ping requests.
5. Edit a rule / view its properties
If you ever need to modify a rule or dig into more advanced properties of a firewall rule, back on the Inbound Rules screen, you can right-click on any firewall rule and head to Properties.
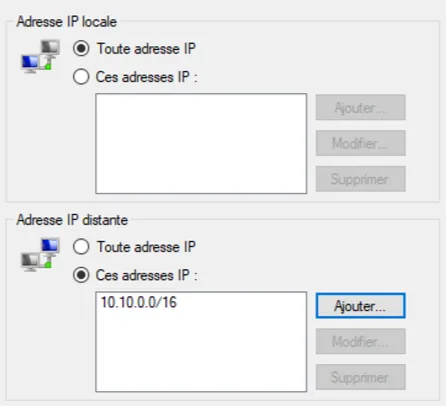
In these tabs, you have the ability to modify all the criteria relating to the rule. For example, you can accommodate additional ports, you can change the firewall profiles it applies to, or you can even restrict the specific IP addresses to which this rule applies using the Scope tab.
This allows you to apply your firewall rule only to traffic going to or coming from a specific part of your network or a certain subset of machines. For example, here I have modified my Scope tab to reflect the fact that I only want this firewall rule to apply to traffic coming from the 10.10.0.0/16 subnet:
Now that you know a little more about how to create a new rule, I suggest you keep up your momentum by taking a little look at the article that shows you How rule deployment through GPO works.